Hardness Tests of Materials
Definition of hardness: Hardness is a surface property. It is defined as the resistance of a material against permanent deformation of the surface in the form of scratch, cutting, indentation, or mechanical wear. Diamond is the hardest known material.
In various hardness tests, the indentors are used to introduce indentation on the surface. The shape of indenters may be a spherical ball, a cone, or a pyramid. Various hardness test methods are as under:
- Mohs hardness test with scale range 0 to 10.
- Brinell’s hardness test with scale range 0 to 3000.
- Rockwell’s hardness test with scale range 0 to 1000.
- Vicker’s hardness test with scale range 0 to 3000.
- Knoop’s hardness test for hardness of microscopic areas.
- Shore’s hardness test for hardness of rubber, plastics, paper etc.
- Barcol’s hardness test for checking the degree of cure of plastics and composites.
- Jominy’s hardness test for end-quenched metals.
- Rebound hardness test or Shore Scleroscope’s method.
Mohs Hardness Test
Mohs hardness test is the oldest one and is named after Friendrich Mohs, a mineralogist. It was conducted on rocks and minerals. Mohs hardness (HM) is 1 for talc, 1 to 3 for layered minerals, 4 to 5 for ionic bonded materials, 6 to 8 for ionic-covalent bonded materials, 9 to 10 for covalent bonded materials and 10 for diamond. Gypsum, quartz and corundum scale on HM = 2, 7 to 8, and 9 respectively.
On this scale, fingernail measures 2.5, copper coin 3.5, window glass 5.5 and steel file 6.5. Steel, hard metals and alloy steels will comparatively measure HM,= 4 to 5, and 7. Lead (Pb) shows its hardness much below HM, = 1 on Mohs scale.
Brinell Hardness Test
This test employs a diamond or hardened steel ball as indentor. The ball is placed suitably in the upper housing of Brinell Hardness Testing Machine. This machine is called a push-pull button type machine because the indenting load is applied by pushing a button.
There are several push buttons, each of them specifies a known load. Before conducting the test, the surface of the specimen is made free from oil, grease, dust and dirt. The indenting load P is applied on the specimen gradually for a minimum of 30 seconds. The load stage is different for various types of materials to be tested, and is given by
P = λD2
Where, D is diameter of the ball. And A is a constant whose value varies between 0.5 and 30.

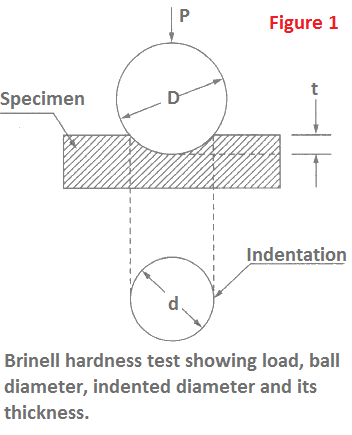
Observation and calculation: The effect of this load is to make an indentation of depth t and diameter d as shown in Figure 1. The Brinell Hardness Number (BHN) is then calculated as below after measuring d by an optical microscope.
BHN = Indenting load (in kgf) / Spherical surface area of indentation (in mm2)
= P / [πD{D – (D2 – d2)1/2}/2]
Test requirements and limitations: Test requirements, noticeable observations, and limitations of Brinell hardness test are as under:
1. The steel ball indentor may be used to test the specimen of cast iron, unhardened steel and light alloys.
2. Standard diameters of the ball are 2.5 mm, 5 mm and 10 mm.
3. Deformation of the ball during application of indenting load is neglected in calculating Brinell hardness number.
4. Usually the diameter of indentation d = 0.2D to 0.7D.
5. Thickness of the specimen should not be less than 10 times the expected depth t (Figure 1) of the impression.
6. If the impression of indentation is non-circular, the mean value should be taken from two diameters that are normal to each other.
7. Value of BHN is expressed in kgf/mm2 or N/mm2.
8. For most of the metals, BHN is proportional to their tensile strengths.
9. For steel, the tensile strength = 35 BHN (in N/mm2)
10. Brinell hardness test is not accurate for BHN > 500, as the ball itself deforms.
The drawbacks in Brinell Hardness Test are:

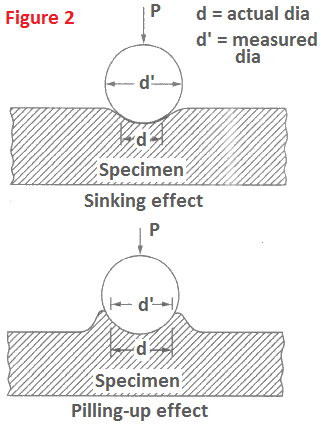
- Sinking effect which occurs in manganese steel and austenitic steel.
- Pilling up effect which occurs in lead, tin and magnesium etc.
Rockwell Hardness Test
This test is more common due to its quick and simple method. There is no need of any calculation because the Rockwell Hardness (HR) may be read directly on the dial.
The test involves application of an initial load of 10 kgf on the specimen so that the effects of dust, dirt, oil etc. are nullified. This makes Rockwell test more accurate than Brinell’s test.
Indentor and test procedure: This test employs a ball and a cone as indentors. The specimen is subjected to a major load for about 15 seconds, after the initial load.
ASTM specifies 13 scales for testing of vide range of materials ranging from very soft to very hard. These scares are named as A, B, C, D, E, F, M, R etc. Of these B-scale and C-scale are commonly employed.
B-scale is preferred for soft steels and aluminum alloys while C-scale is chosen for titanium and hard steel. B-scale employs a ball of 1/16 inch = 1.58 mm diameter. A cone indentor is used in C-scale with a cone angle of 120° and point of radius 0.2 mm. Hardness value determined from B-scale is referred to as HRB and from C-scale as HRC.
Different scales, initial and major loads to be given on them, their suitability to kind of materials and other related details are given in the following Table.
| Scale | Type of indentor (dimensions) | Initial load (kgf) | Major load (kgf) on dial | Pointer position | Kind of material |
| A | Cone, 120o | 10 | 50 | 0 | Much harder such as carburized steel, cemented carbides. |
| B | Ball, 1.58 mm | 10 | 90 | 30 | Soft steels, copper, aluminum, brass, grey cast iron. |
| C | Cone, 120o | 10 | 140 | 100 | Hard steels, Ti, W, Va etc. |
| D | Cone | 10 | 90 | – | Thin ferrous metals |
| E | Ball, 3.0 mm | 10 | 90 | – | Very soft such as bearing metals, magnesium alloys etc. |
| F | Ball, 1.58 mm | 10 | 50 | – | Soft such as babbits, bronze, brass etc. |
Result: If the depth of penetration t in mm, (Figures 1 and 3) is known, then the hardness may also be calculated as follows
HRA = 100 – t/0.002
HRB = 130 – t/0.002
HRC = 100 – t/0.002
Suitable applications: The Rockwell hardness test may be used to determine the hardness of wires, blades, inside and outside cylindrical surfaces like IC engine cylinder and piston. Finished components can also be tested by this method as the indentation made is small. This method is suitable for hardness beyond the range of Brinell Hardness Number.
Vickers Hardness Test
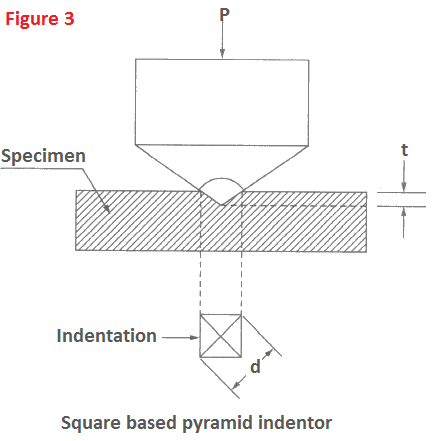
This test is similar to Brinell’s test but uses a different type of indentor. A square based pyramid indentor of cone angle α = 136° between opposite faces of pyramid is used. The applied loads may be 5, 10, 30, 50, 100 or 120 kgf. The Vickers hardness HV is calculated from the following relation:
HV = P/(d2/2sinα/2)
= 1.8544P/d2 for α = 136o
Where P is the applied load in kgf, d is the diagonal length in mm of indentation made by the pyramid.

The indentor and the indentation are shown in Figure 3. This test is performed for
smaller cross-sections, very hard materials, polished and nitrided surfaces, and very thin test pieces.
Knoop Hardness Test
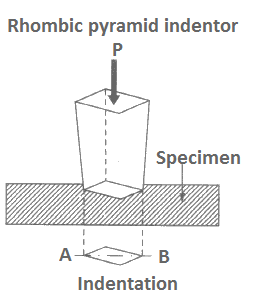
A rhombic pyramid as shown in Figure is used as an indentor in this test. The included angle α of the pyramid is 72.5° and 130°. Knoop hardness HK is determined from the following formula:
HK = P/0.07026d2

Where the applied load is P in newton, and d in mm is the impression of longer diagonal AB of rhombic pyramid. The diagonals of the pyramid bear a ratio of 7 : 1.
This test is suitable for studying micro-hardness like hardness of individual grains.
Shore Hardness Test
This test is suitable for determining hardness of very thin and very soft metals, and nonmetals. Plywood, paper, bark of tree, leather and rubber are generally Shore tested.
There are 5 scales viz. Shore A, B, C, D and F to test the hardness of materials according to their suitability. Scale A is used for soft rubbers and foamed plastics, while scale D is used for hard rubbers and leathers.
Shore tester, also known as durometer, is a handy instrument having a dial and a pointer. The pointer is pressed on the specimen and the hardness is instantaneously read on the dial. The hardness scale ranges between 0 to 100 on these durometers.
Barcol Hardness Test
This test determines the degree of curing of polymers and polymeric composites. A specimen showing 90% of the Barcol hardness value on Barcol tester is supposed to be cured. Hardness of the gel coat may also be determined by estimating Barcol hardness value.
This value is temperature dependent, hence the result is specified at a certain prefixed temperature.
Jominy’s End-Quenched Test
Ability of a material to get hardened by any process is called hardenability. All materials do not show equal hardenability. High carbon steel shows greater degree of hardenability than mild steel.
In steel, it can be measured by Jominy end-quench test. This test involves quenching of heated specimen at one end by stream of water.
Rebound Hardness Test
This test is also known as Shore Scleroscope’s method. In this test, a small steel or diamond tipped weight is dropped from a known height. Its rebalance is measured which directly tells the hardness value. Less than 1 mm thick jobs and case hardened surfaces may be tested by this method.